A tie is a piece of clothing worn at the collar of the upper garment. It is tied around the collar of a shirt and tied in a knot in front of the chest. In a broad sense, it includes a bow tie. It is usually worn with a suit and is the most basic clothing item for people (especially men) when getting married and in daily life. When wearing a formal suit, tying a beautiful and well-tied tie not only looks elegant and grand but also gives people a sense of dignity and solemnity. So, how to tie a beautiful knot with a tie for various events, such as business, celebrations, etc. Now, I will talk about some detailed methods of tying a tie knot for friends in need to refer to and operate:
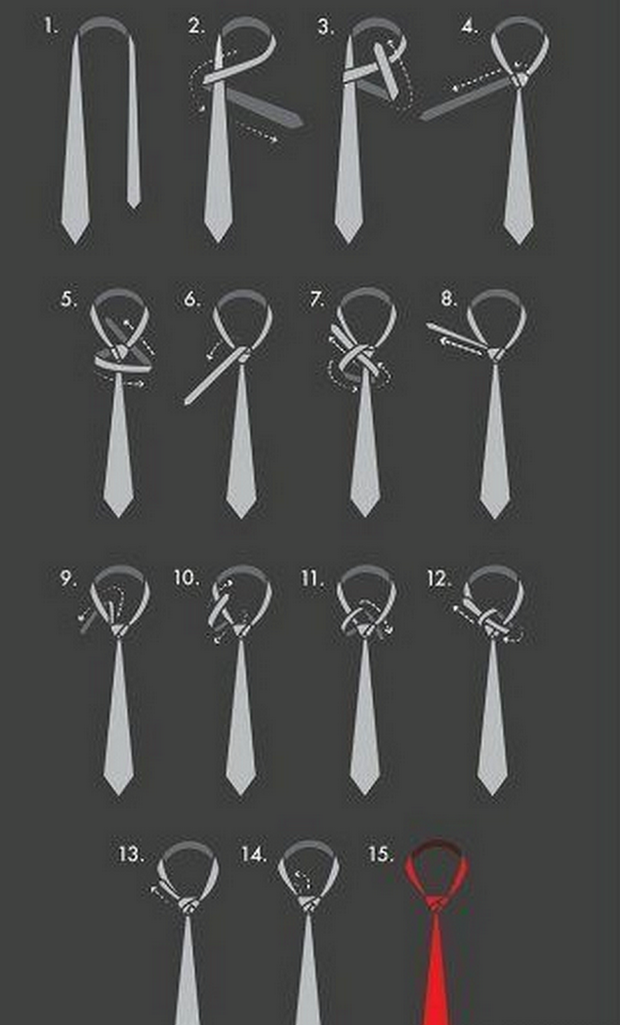
A comprehensive illustrated guide to tying a tie
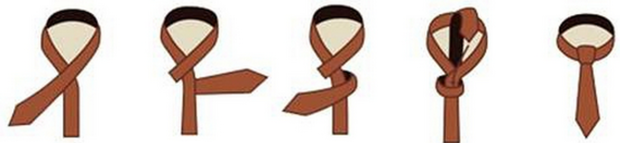
Flat knot: The flat knot is one of the most popular tie tying methods chosen by men. It is almost suitable for ties made of all materials. After completion, the tie is tied in a slanted triangular shape and is suitable for narrow-collared shirts. The key to tying this tie knot: The wide side in the picture is on the left side. You can also tie it on the right side instead. When choosing “a man’s dimples” (forming concave and convex), try to make both sides uniform and symmetrical (as shown in the following figure)
Double loop Knot: A fine-textured tie paired with a double loop knot can create a strong sense of fashion and is suitable for young office workers. The key to tying this tie knot: The distinctive feature of this tie tying method is that the first loop will be slightly exposed beyond the second loop. Don’t deliberately cover it (as shown in the picture below)
Cross knot: This is a tie tying method suitable for single-color, elegant and thin ties. Men who like to show a sense of fashion can use the “cross knot” more often. The feature of the cross knot is that there is a dividing line in the knot, which is suitable for ties with elegant colors and thin materials. It looks very fashionable. Key points for tying this tie knot: Note that when tying the tie, follow the steps with the back facing forward (as shown in the picture below) :
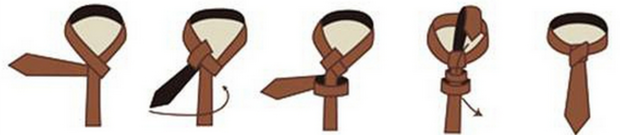
Double cross Knot: The double cross knot can easily reflect a man’s elegant and grand temperament and is suitable for formal occasions. This tie tying method should be more often used on plain and silk ties. If paired with a large lapel shirt, it not only suits but also gives a sense of nobility. The key to tying this tie knot: The wide edge should be threaded out between the first and second loops to achieve a full and full appearance (as shown in the picture below)
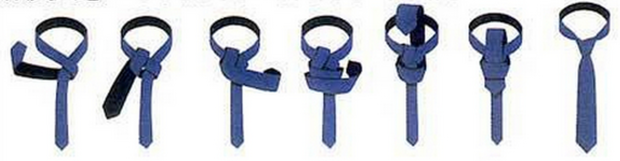
Windsor Knot: This knot is named after the Duke of Windsor and is the most orthodox way to tie a tie. The knot formed is an equilateral triangle, full and powerful, and is suitable for pairing with wide-neck shirts. The knot should be developed more horizontally. Avoid ties made of overly thick materials and do not tie them too big. The key to tying this tie knot: leave a longer space on the wide side first. The tightness or looseness when winding the tie will affect the size of the tie knot (as shown in the following picture)

Prince Albert’s Knot: The Prince Albert’s knot is suitable for romantic butt-collar and pointed-collar series shirts. Paired with a thin tie made of soft romantic materials, the “Chinese dimmer” has slightly curved sides. The key to tying this tie knot: Leave a longer space on the wide side first, and try to make it fit together as closely as possible when winding the second circle, to complete this perfect knot shape (as shown in the picture below)
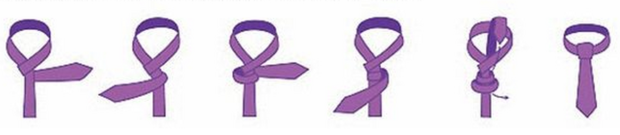
Summary: This tie is suitable for thicker ties and is most suitable for tying on standard and button-collar shirts. It is easy to tie and very suitable for use during business trips. Its feature is to first twist the wide end 180 degrees from top to bottom and hide the fold at the back to complete the tying. This tie knot is very tight and was popular among British coves at the end of the 18th century. After completion, the length of the tie can be adjusted. The key to tying this tie knot is convenient and fast when going out and getting ready. The common coachman knot is the simplest among all tie tying methods, especially suitable for thick fabric ties, and will not make the tie knot overly bulky and cumbersome (as shown in the picture below) :
Romantic Knot: The romantic knot is a perfect knot type, thus it is suitable for the collars and shirts of various romantic series. The romantic knot can be freely enlarged or reduced by adjusting the pleats, and the length of the remaining part can also be controlled as needed. The tie knot shape of the romantic knot is symmetrical, and the tie line is straight and beautiful, which is easy to leave a good impression of being neat and strict. The key to tying this tie knot: The wide edge below the bow tie can be creased to reduce its shape. The narrow edge can also be moved left and right to make a small part appear beside the wide edge tie (as shown in the following figure)
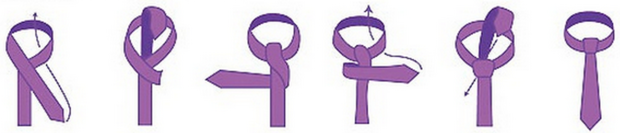
The Half Windsor Knot: It is most suitable to be paired with romantic pointed-collar and standard collar series shirts. The Half Windsor knot is a symmetrical tie knot, slightly larger than the Pratt knot but smaller than the Windsor knot. It seems to have many steps, but it is not difficult to make. After tying, the bow knot is usually in a very straight position. The key to tying this tie knot: Wearing a thin tie is easier to handle and is suitable for people who don’t often wear ties (as shown in the picture below)
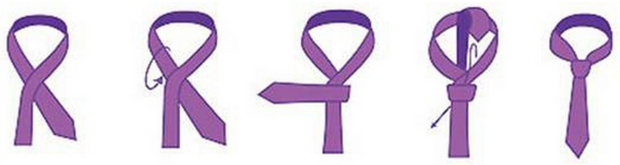
The four-handed knot: Among all the bow ties, it is the easiest to handle and suitable for various romantic series of shirts and ties. It can be tied in just four steps, hence the name “Four-handed Knot”. It is the most convenient way to tie a tie, suitable for narrow ties and paired with narrow-collared shirts. The style is casual and suitable for ordinary occasions. The key to tying this tie knot: When choosing to form concave and convex patterns, try to make both sides uniform and symmetrical (as shown in the following figure)
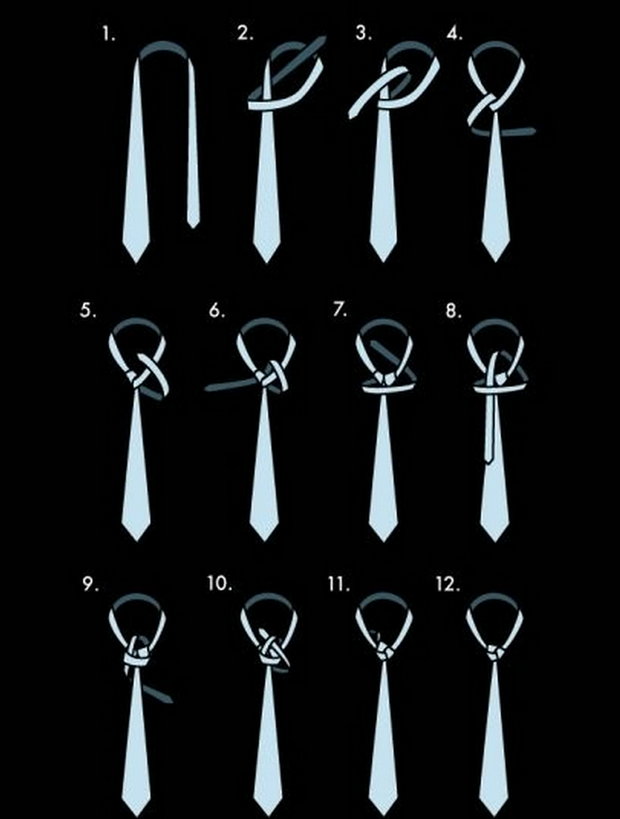
Trinity Knot This kind of tie knot is very beautiful, interwoven into a perfect triangle with three parts. However, remember to use a light and thin tie strap to tie this tie knot, otherwise the tie knot will appear particularly heavy. Tying a “three-knot” with tie straps of different textures will have different effects. For example, tying a “three-knot” with a smooth satin-textured tie strap will enhance the luxurious effect. However, the TrinityKnot must be tied very tightly; otherwise, it is prone to loosening. The first few steps are somewhat similar to the way to tie a Windsor knot, except that the Windsor knot is tied with the thicker end of the tie, while the Three-Knot is tied with the thinner end of the tie. Steps 9 and 10 are the most crucial ones. When tying, the surface of the tie should be stretched out neatly; otherwise, the final tie knot will look wrinkled (as shown in the picture below)
Eldredge Knot This is a very beautiful yet very complex tie knot. It embodies perfect fullness, triangles, and a sense of layering. It makes us realize that a tie can be tied in this way. Whoever sees this tie knot will surely want to give it a try. The first five steps are the way to tie a half Windsor knot. After completing the first layer of the tie knot, wrap another layer on this basis. After finishing, hide the extra small section of the tie behind the tie knot. Just like the Windsor knot, the “Eldridge Knot” is also a suitable tie knot for wide-neck shirts (as shown in the picture below) :